
Migrate VMWare ESXi Virtual machine to Proxmox VE 7.1
Introduction
Migrating virtual machines between platforms can be a pain in the ass to put it mildly.
I have recently decided to migrate from ESXi to Proxmox VE, simply because it allows me downscale my lab from several “BIG” machines into a single machine.
I am well aware that this makes my lab more fragile and prone to failures, but that is a price I am willing to take - at least for now.
So this leaves me with the task of migrating all my virtual machines from ESXi to Proxmox VE.
Luckily after a bit of googling, I decided on the simplest approach from my point of view.
Prerequisites
Software is required to allow the migration to happen, but not a lot.
Ovftool is what makes the magic work. It can convert a virtual machine into a ovf package.
Head to vmware’s website and download version 4.4.3 of ovftool.
Copy the downloaded zip VMware-ovftool-4.4.3-18663434-lin.x86_64.zip to your proxmox VE server.
Unzip the archive via the command unzip. If you get a command not found error message simply install unzip via apt-get install unzip
Then you unzip the archive via the command unzip VMware-ovftool-4.4.3-18663434-lin.x86_64.zip
This should create a folder in the current directory called ovftool.
Export process
Change directory to the ovftool folder and run the command:
./ovftool vi://root@[esxi hostname]>/[virtual machine name]> [destination directory]
The program will ask you for the root password, which you just enter and if everything checks out, i.e. you entered correct information, then the export starts.
An example from my environment is:
./ovftool vi://[email protected]/devops.root.dom /tank/vms/
The the export is done, then a folder is created in the destination directory with the name of the virtual machine, i.e. in my case it would be named /tank/vms/devops.root.dom.
Inside that folder several files are located.
- The ovf file, which is the
descriptorfor the virtual machine, which describes the hardware of the vm and also extra anotations from ESXi. - The vmdk files which is the virtual disks from your virtual machine
- A .mf file, which contains hashes of the files so you can be sure nothing has tampered with the files.
- A nvram file, which is where ESXi stores BIOS information I assume.
The export is done and there are several ways to import the VM into proxmox.
Alternative to export via ESXi server
If you have direct access to the same datastore where ESXi stores the virtual machines, i.e. NFS or similar, then you can also just do a direct export from the vmx file to a ovf.
This has almost the same syntax:
./ovftool /storagefolder/virtualmachine.vmx [destination directory]
Doing it directly from the storage will have speed advantages since you cut out the ESXi server as the middle man, but it might not always be possible.
Import process
The easiest way to get the virtual machine into proxmox is simply to create a new virtual machine inside proxmox and then attach the vmdk files directly. This takes the least effort but will also give disadvantages, where the most important disadvantage in my opinion is that proxmox cannot resize disks that is backed by a vmdk - and also snapshots cannot be made. So taking the least effort when importing into proxmox will bite you in the ass down the road.
Luckily its fairly easy to import the virtual machine.
Simply do a qm importovf [vmid] [source ovf file] [destination storage]
An example from my lab:
qm importovf 300 /tank/vms/devops.root.dom/devops.root.dom.ovf vms - this command will convert the disks into whatever format the storage destination uses and import it as a VM with the given ID. In my case 300.
When the process is done you should have a vm called the same as the OVF file and with ID you provided.
In theory this should be enough, but I have had issues with the VM’s I have imported like that, so they needed a little tweaking.
Bios type
You have to ensure that the BIOS type in proxmox matches the bios type in ESXi, i.e. BIOS or UEFI - otherwise the machine will not boot, since all boot loaders are different.
The import seems to always default to BIOS.
Simply head to the options page and change it to match:
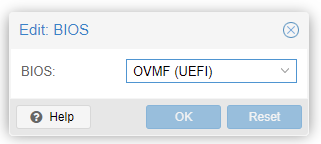
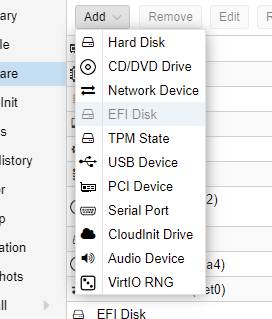
If you changed it to UEFI type, then you also have to add an EFI disk where proxmox can store information bout keys it uses for secure boot.Plus probably other information about the virtual machine. This is done in the hardware section.
Change disk type to SATA
This is a little counter intuitive how its done.
First you have to detach the hard drive - then you can edit it and select that it should become attached to the SATA bus:

Boot order
This confused me a lot - my VM’s refused to boot, but it was simply because when you detach and attach disks, they are not automatically added to the boot order again, so your machine will just stay at the boot prompt looking silly.
So you have to go the options and change the boot order so the SATA disk is first:

Remainder tasks
Hopefully this will allow it to boot - if not you might have to tweak a little in options or hardware.
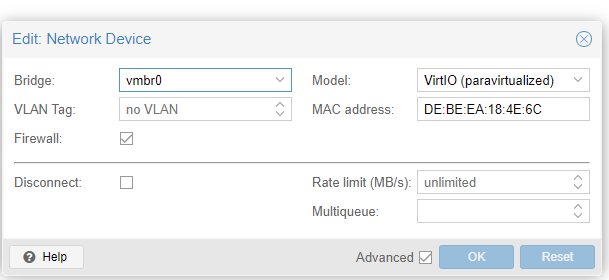
Then you have to add a network device, unless you are happy with using the VMXnet3 device for the network controller - which I do not suggest you should be, since that will not allow proxmox to integrate properly.
So add or edit the network controller to use the Virt IO driver:
Qemu quest agent
When you have the hardware working as expected, then you should install the qemu-quest-agent, which is similar to the VMWare tools that you installed on the ESXi virtual machines.
Depending on what linux distribution you are running the commands are different, but the package should be named qemu-quest-agent.
On windows you can download a driver disk - simply update your drivers by going to device manager and pointing it to the iso you have have mounted in the virtual machine.
On the same CD-ROM the quest agent is also located in the folder quest-agent. Simply run the installer that maches your OS, i.e. 32 or 64 bit.
All done
This should be it. Hopefully everything works - if not feel free to leave a comment with what extra steps you had to take.